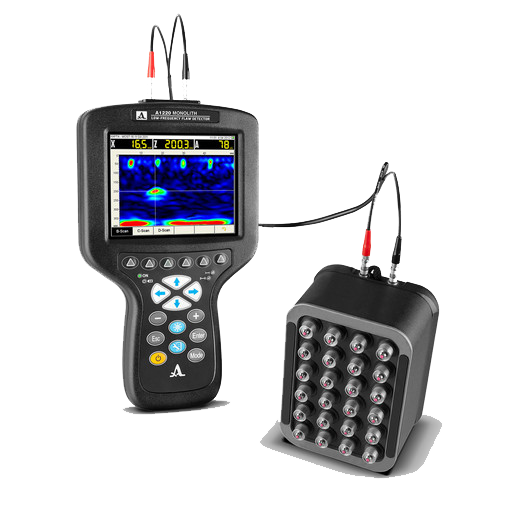
A1220 MONOLITH 3D

Description

A compact handheld ultrasonic pulse velocity and pulse echo tester is designed for ultrasonic thickness measurements and flaw detection of concrete and reinforced concrete constructions and rocks.

The flaw detector represents an compact electronic unit is equipped with a large high-contrast TFT display and a keyboard.

Despite multifunctionality the instrument is easy to use due to its intuitive interface and icons menu providing quick access to main settings and functions of the instrument.

Ergonomic design of the flaw detector and its light weight (as little as 800 grams), as well as capability of fastening the electronic unit in the specialized pad, provide convenient operation of the instrument in hard-to-reach areas and allow its working at height.

All inspection results are recorded into the instrument’s memory and can be transferred via the USB-port to the external PC for further processing, registration and archivation.

Application

Using one low frequency dry point contact antenna array M2502 0.05A0R100Х60PS with shear wave and nominal frequency 50 kHz allows carrying out thickness measurement of the concrete objects up to 3 000 mm and reinforced concrete objects up to 600 mm.

The instrument allows to operator search for internal foreign inclusions, cavities, voids and cracks of the products and constructions made of reinforced concrete, stone and similar materials at one-sided access as well as search for embedded flaws of bronze castings.

It is possible to testing of the internal structure of the coarse-grained materials.

The results of inspection are slice and projection images by grid-scan function (B-Scan, C-Scan, D-Scan, thickness-profile) – visualization software INTROVIEW.

Spesification

Maximum deepness of the echo-signals visualization (at transversal wave control)2150 mm
Maximum length of the signal realizations, visible on the device’s screen1600 μs
Maximum measured thickness of concrete (concrete grade 400)600 mm
Minimal diameter of flaw in form of an air cylinder30 mm
The error of measurements of flaw location thickness and depths10 %
Time of one measurement processing and writing the result in memory10 s
The number of single A-scans, that can be written into memory200
Maximal area of controlled surface (MAP mode)2 m2
Material velocity range1 000 – 9 999 m/s
Drive-pulse generator amplitude20, 100, 200 V
Pulse formMeandr, 0.5÷5.0 periods
Pulse frequency1 – 50 Hz
Receiving bandwidth10 – 300 kHz
Gain setup rangefrom 0 to 100 dB, step 1 dB
The quantity of the programmable points of DAC function32
DAC function setup range30 dB
Power sourceBuilt-in battery
Operation time14 h
Battery charging time3 h
Operating temperature rangefrom –20 to +45 ºC
Display typeTFT (640 х 480)
Electronic unit size260 х 156 х 43 mm
Electronic unit weight800 g
Size of M2502 antenna array139 х 105 х 89 mm
Weight of M2502 antenna array1,1 g

Standard Packages

• A1220 MONOLITH – ultrasonic flaw detector
• Antenna array М2502 0.05A0R100X60PS
• Double LEMO 00 – LEMO 00 cable 1,2 m
• USB A – Micro B cable
• Net adaptor with cable 220V-15V
• Carrying map-case
• Soft cover
• Case
• Visualization software INTROVIEW (3D tomographic imaging by grid-scan function, advanced visualization and analysis functionality
Slice and projection images by grid-scan function (B-Scan, C-Scan, D-Scan, thickness-profile)

Download Media

• Operation manual
• Advertising flyer (Metric)
• Advertising flyer (Imperial)

Reviews

There are no reviews yet.

Be the first to review “A1220 MONOLITH 3D”

Your email address will not be published. Required fields are marked *